Flutter Home Widget Creation Guide: Cross‑Platform Widgets for Android and iOS
Step-by-step Flutter guide to build home screen widgets for Android and iOS using native WidgetKit/AppWidget with Dart-driven updates.
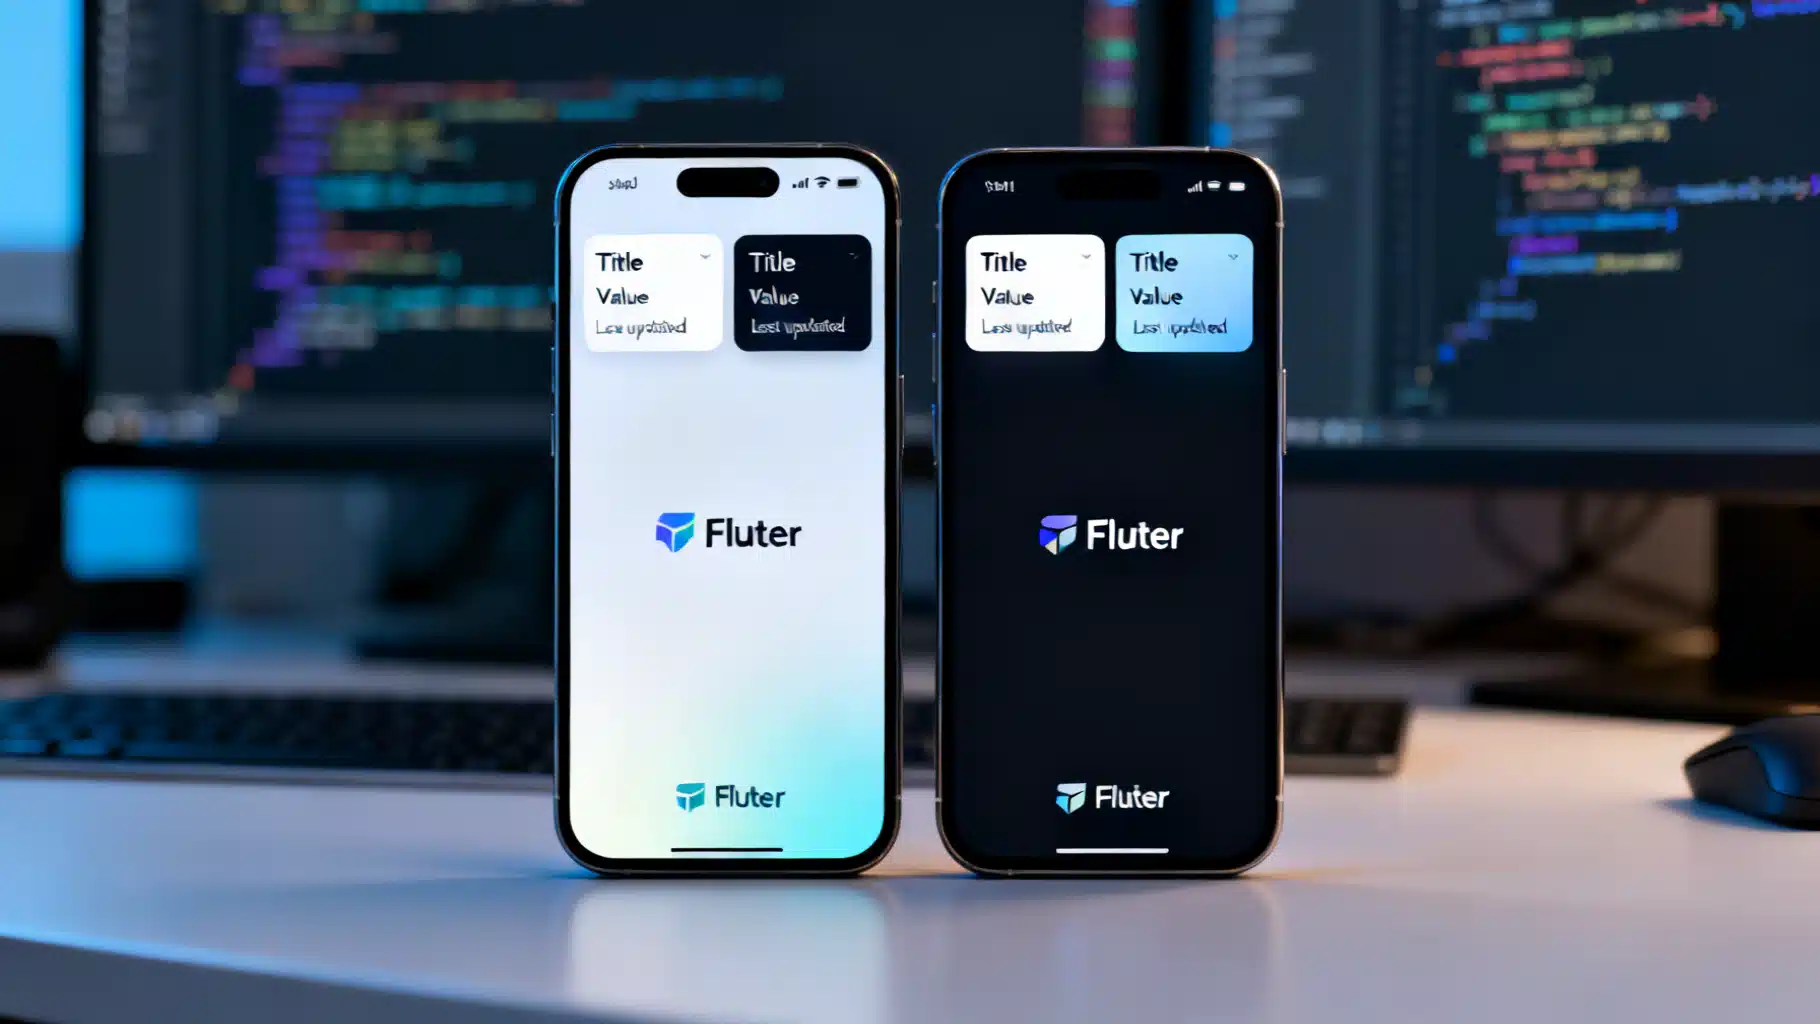
Image used for representation purposes only.
Overview
Home screen widgets let users glance at key information without opening your app. In Flutter, you achieve this with a small amount of native code for Android (AppWidgetProvider) and iOS (WidgetKit), while managing state, updates, and business logic in Dart. This guide explains architecture, limitations, and an end‑to‑end setup so you can ship a reliable, cross‑platform home widget.
What you can and can’t do
Home widgets are intentionally constrained by Android and iOS. Plan your UX around these rules:
- Layouts are static and compact; no scrolling, animations, or arbitrary Flutter UI.
- Interactions are limited: usually tap-to-open your app (Android supports some button-like taps via PendingIntent; iOS widgets use Links/Intents but not arbitrary gestures).
- Update frequency is throttled by the OS to protect battery. Push only when it matters.
- Background code is native. Flutter renders your app UI; widgets render via RemoteViews (Android) or SwiftUI (iOS WidgetKit).
Architecture at a glance
- Flutter app (Dart): owns data, triggers updates, writes to a shared store.
- Shared storage: SharedPreferences (Android) and App Group UserDefaults (iOS) or a cross‑platform helper via a plugin.
- Native widget:
- Android: AppWidgetProvider + RemoteViews layout.
- iOS: Widget Extension (WidgetKit) + TimelineProvider (Swift).
- Update flow: App saves data → requests widget refresh → widget reads shared data → re-renders.
Choosing an approach
- Use a plugin to simplify cross‑platform glue (commonly named “home_widget” in pub). Pros: fewer native steps, shared helpers for data and refresh. Cons: still requires minimal native setup.
- Roll your own: maximum control, more boilerplate. Recommended only if you have special needs.
This guide shows the plugin-first path, then highlights the native steps you must still perform.
Project setup
- Create a Flutter app.
- Add a home widget plugin in pubspec.yaml (use the latest published version):
dependencies:
  flutter: any
  home_widget: any
- Run flutter pub get.
Data model and keys
Define a tiny, serializable data model for the widget. Keep it small and stable. Example keys:
- widget_title: String
- widget_value: String or number
- widget_updated_at: ISO 8601 string for display
Flutter code: save data and trigger updates
Initialize the plugin early (e.g., in main) and write helpers to save data and request a refresh.
import 'package:flutter/material.dart';
import 'package:home_widget/home_widget.dart';
const appGroupId = 'group.com.example.myapp'; // iOS App Group ID
const androidWidgetProvider = 'com.example.myapp.MyWidgetProvider';
const iosWidgetKind = 'MyWidget'; // matches your WidgetKit kind identifier
Future<void> initHomeWidget() async {
// On iOS, ensure the App Group matches your Widget Extension configuration.
await HomeWidget.setAppGroupId(appGroupId);
}
Future<void> updateHomeWidget({required String title, required String value}) async {
final now = DateTime.now().toIso8601String();
await HomeWidget.saveWidgetData('widget_title', title);
await HomeWidget.saveWidgetData('widget_value', value);
await HomeWidget.saveWidgetData('widget_updated_at', now);
// Ask the OS to refresh the native widget.
await HomeWidget.updateWidget(
name: androidWidgetProvider,
iOSName: iosWidgetKind,
);
}
void main() async {
WidgetsFlutterBinding.ensureInitialized();
await initHomeWidget();
runApp(const MyApp());
}
class MyApp extends StatelessWidget {
const MyApp({super.key});
@override
Widget build(BuildContext context) {
return MaterialApp(
home: Scaffold(
appBar: AppBar(title: const Text('Home Widget Demo')),
body: Center(
child: ElevatedButton(
onPressed: () => updateHomeWidget(
title: 'Balance',
value: ' 4b0 1,245',
),
child: const Text('Update Home Widget'),
),
),
),
);
}
}
Notes:
- Call setAppGroupId only on iOS. Using it cross‑platform is harmless if the plugin supports it.
- Keep updates infrequent; batch data, then call updateWidget once.
Android implementation
Android widgets are built with RemoteViews and managed by an AppWidgetProvider.
1) Create a layout for the widget
res/layout/widget_small.xml
<?xml version="1.0" encoding="utf-8"?>
<LinearLayout xmlns:android="http://schemas.android.com/apk/res/android"
    android:orientation="vertical"
    android:padding="12dp"
    android:background="@drawable/widget_bg"
    android:layout_width="match_parent"
    android:layout_height="match_parent">

    <TextView
        android:id="@+id/txtTitle"
        android:text="Title"
        android:textStyle="bold"
        android:textSize="14sp"
        android:layout_width="wrap_content"
        android:layout_height="wrap_content"/>

    <TextView
        android:id="@+id/txtValue"
        android:text="--"
        android:textSize="18sp"
        android:layout_width="wrap_content"
        android:layout_height="wrap_content"/>

    <TextView
        android:id="@+id/txtUpdated"
        android:text="Updated just now"
        android:textSize="12sp"
        android:alpha="0.7"
        android:layout_width="wrap_content"
        android:layout_height="wrap_content"/>
</LinearLayout>
2) Declare widget info
res/xml/my_widget_info.xml
<?xml version="1.0" encoding="utf-8"?>
<appwidget-provider xmlns:android="http://schemas.android.com/apk/res/android"
    android:minWidth="120dp"
    android:minHeight="60dp"
    android:updatePeriodMillis="0"
    android:initialLayout="@layout/widget_small"
    android:resizeMode="horizontal|vertical"
    android:widgetCategory="home_screen"/>
3) Create the provider class
Kotlin: app/src/main/java/com/example/myapp/MyWidgetProvider.kt
package com.example.myapp

import android.app.PendingIntent
import android.appwidget.AppWidgetManager
import android.appwidget.AppWidgetProvider
import android.content.Context
import android.content.Intent
import android.widget.RemoteViews

class MyWidgetProvider : AppWidgetProvider() {
  override fun onUpdate(context: Context, appWidgetManager: AppWidgetManager, appWidgetIds: IntArray) {
    for (id in appWidgetIds) {
      val views = RemoteViews(context.packageName, R.layout.widget_small)

      // Read values previously saved by Flutter via your chosen plugin.
      val title = readShared(context, "widget_title", "Title")
      val value = readShared(context, "widget_value", "--")
      val updated = readShared(context, "widget_updated_at", "--")

      views.setTextViewText(R.id.txtTitle, title)
      views.setTextViewText(R.id.txtValue, value)
      views.setTextViewText(R.id.txtUpdated, "Updated $updated")

      // Tap opens the app (deep link optional)
      val intent = Intent(context, MainActivity::class.java).apply {
        action = Intent.ACTION_VIEW
      }
      val flags = PendingIntent.FLAG_IMMUTABLE or PendingIntent.FLAG_UPDATE_CURRENT
      val pendingIntent = PendingIntent.getActivity(context, 0, intent, flags)
      views.setOnClickPendingIntent(R.id.txtValue, pendingIntent)

      appWidgetManager.updateAppWidget(id, views)
    }
  }

  private fun readShared(context: Context, key: String, fallback: String): String {
    val prefs = context.getSharedPreferences("HomeWidgetPreferences", Context.MODE_PRIVATE)
    return prefs.getString(key, fallback) ?: fallback
  }
}
Tip: If you use a plugin, prefer its provided helper to access the same SharedPreferences file and keys it writes. The file name above is illustrative—match it to your plugin.
4) Register the provider in AndroidManifest.xml
<receiver
    android:name=".MyWidgetProvider"
    android:exported="false"
    android:label="My Widget">
    <intent-filter>
        <action android:name="android.appwidget.action.APPWIDGET_UPDATE" />
    </intent-filter>
    <meta-data
        android:name="android.appwidget.provider"
        android:resource="@xml/my_widget_info" />
</receiver>
iOS implementation
iOS widgets are delivered via a separate Widget Extension target using SwiftUI and WidgetKit. They read from an App Group shared store you configure in both the app and the extension.
1) Add a Widget Extension
- In Xcode: File → New → Target → Widget Extension.
- Name it MyWidget and choose Swift/SwiftUI.
- Enable App Groups for both the app target and the widget extension, e.g., group.com.example.myapp.
2) Swift: read shared data and build the view
MyWidget.swift (in the widget extension)
import WidgetKit
import SwiftUI

let appGroupId = "group.com.example.myapp"

struct Provider: TimelineProvider {
    func placeholder(in context: Context) -> SimpleEntry { SimpleEntry(date: Date(), title: "Title", value: "--", updated: "--") }
    func getSnapshot(in context: Context, completion: @escaping (SimpleEntry) -> ()) {
        completion(loadEntry())
    }
    func getTimeline(in context: Context, completion: @escaping (Timeline<SimpleEntry>) -> ()) {
        let entry = loadEntry()
        // Policy .atEnd means the system decides when to reload; you can also schedule a refresh.
        completion(Timeline(entries: [entry], policy: .atEnd))
    }

    private func loadEntry() -> SimpleEntry {
        let defaults = UserDefaults(suiteName: appGroupId)
        let title = defaults?.string(forKey: "widget_title") ?? "Title"
        let value = defaults?.string(forKey: "widget_value") ?? "--"
        let updated = defaults?.string(forKey: "widget_updated_at") ?? "--"
        return SimpleEntry(date: Date(), title: title, value: value, updated: updated)
    }
}

struct SimpleEntry: TimelineEntry { let date: Date; let title: String; let value: String; let updated: String }

struct MyWidgetEntryView : View {
    var entry: Provider.Entry
    var body: some View {
        VStack(alignment: .leading, spacing: 4) {
            Text(entry.title).font(.caption).bold()
            Text(entry.value).font(.headline)
            Text("Updated \(entry.updated)").font(.caption2).foregroundColor(.secondary)
        }
        .padding()
        .widgetURL(URL(string: "myapp://open")) // tap opens the app via deep link
    }
}

@main
struct MyWidget: Widget {
    let kind: String = "MyWidget"
    var body: some WidgetConfiguration {
        StaticConfiguration(kind: kind, provider: Provider()) { entry in
            MyWidgetEntryView(entry: entry)
        }
        .configurationDisplayName("My Widget")
        .description("Glanceable info.")
        .supportedFamilies([.systemSmall, .systemMedium])
    }
}
Notes:
- Ensure the kind matches the iOSName you pass from Dart.
- Use widgetURL to deep-link into your app; register the URL scheme in Info.plist of the app target.
Triggering refreshes responsibly
- Manual refresh: After saving new data in Flutter, call updateWidget once.
- Scheduled refresh (iOS): Provide a policy or request a reload using WidgetCenter in the extension or via the plugin’s API from Flutter.
- Periodic update (Android): Prefer push or on-demand updates; use updatePeriodMillis sparingly as the system already limits frequency.
Handling taps and deep links
- Android: Attach a PendingIntent to a view in RemoteViews that opens your MainActivity or a deep link (NavComponent or a custom URI).
- iOS: Use widgetURL in your SwiftUI view and handle the URL in the app.
In Flutter, parse initialLink/intent to navigate directly to the relevant screen when the app opens from the widget.
Formatting and localization
- Keep text short; test in all supported widget sizes.
- Use platform text styles that read well on light and dark backgrounds.
- Localize strings in Flutter and mirror keys in native where displayed directly.
Performance and battery
- Batch updates; avoid frequent writes.
- Serialize only small payloads (strings, numbers, small images via files/URIs if your design demands it).
- Let the OS cache; do not fight the scheduling heuristics.
Testing checklist
- Android: Add the widget to a real home screen; rotate, resize, change themes, and test cold-start behavior.
- iOS: Run the Widget Extension scheme, add widgets in the simulator and on-device, test timeline refreshes, dark mode, and dynamic type.
- Kill the app and confirm the widget still displays last known data.
- Verify deep links on both platforms.
CI/CD notes
- Include the Widget Extension target in your iOS archive configuration.
- For Android, ensure the provider and XML are packaged (no minification issues on resource names).
- Add UI screenshots of widgets for store listings.
Troubleshooting
- iOS widget shows placeholder only: Check App Group entitlement matches in both targets; confirm keys exist in the shared UserDefaults.
- Android widget not updating: Ensure provider is registered, PendingIntent flags are correct (use FLAG_IMMUTABLE on Android 12+), and your updateWidget call uses the correct provider class name.
- Data mismatch: Align key names and the storage location used by Flutter and native code or the plugin’s helpers.
Security and privacy
- Never store secrets in widget-accessible storage.
- If the glance shows sensitive data (e.g., balances), add a user setting to mask it on the home screen.
Next steps
- Add medium/large layouts and responsive variants.
- Provide a configuration Activity (Android) or IntentConfiguration (iOS) to let users customize what the widget shows.
- Consider background fetch or push-triggered refreshes for time-sensitive content, within OS limits.
Minimal file map (for orientation)
- lib/main.dart — save/refresh logic and a demo button.
- android/app/src/main/res/layout/widget_small.xml — layout.
- android/app/src/main/res/xml/my_widget_info.xml — widget metadata.
- android/app/src/main/java/…/MyWidgetProvider.kt — provider logic.
- ios/MyWidget/ — Widget Extension sources.
- Entitlements: App Group on iOS for both app and extension.
With this structure and the sample snippets, you can assemble a robust, battery-friendly Flutter home widget that feels native on Android and iOS while keeping your business logic in Dart.
Related Posts
Flutter + TensorFlow Lite: Local AI Integration Guide
A practical guide to integrating TensorFlow Lite models into Flutter for fast, private, offline on-device AI with performance tuning and code examples.
Flutter In‑App Purchases with RevenueCat: A Complete Guide
Implement Flutter in‑app purchases with RevenueCat: setup, paywalls, purchases, entitlements, trials, testing, and production tips.
Build a Flutter QR Code Scanner and Generator in Flutter
Build a Flutter app that scans and generates QR codes with mobile_scanner and qr_flutter. Includes setup, code, exporting, UX, and tips.